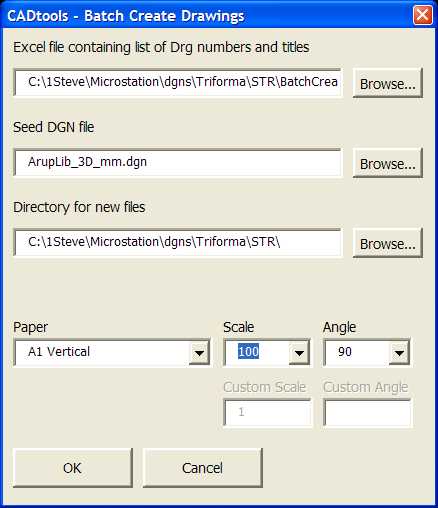
The instructions for using the 'Batch Create Drawings' tool is as follows.
WARNING This is a 'Beta' tool, and should be used with caution. Since it is used for creating drawings, it shouldn't cause too many problems.
1 - Copy the 'BatchCreateDrawings.xls' file from P:\Program Files\Oasys\CADtools_Ustn\Common\Vba\ to the location where you wish to create the new drawings.
2 - Open that Excel spreadsheet, which contains 12 columns.
Column |
Purpose |
Filename |
The name of the new file to be created. This should correspond to the Drawing number, and NOT contain a ".dgn" suffix. MANDATORY |
Title 1 |
The first line of the drawing title. Optional |
Title 2 |
The second line of the drawing title. Optional |
Title 3 |
The third line of the drawing title. Optional |
Title 4 |
The fourth line of the drawing title. Optional |
Reference 1 |
A reference file to be attached to the 'Default' model. Optional |
Reference 2 |
A reference file to be attached to the 'Default' model. Optional |
Reference 3 |
A reference file to be attached to the 'Default' model. Optional |
Mock Border X |
The X coordinate that the mock border will be inserted at. Will be 0 if not filled in. Optional |
Mock Border Y |
The Y coordinate that the mock border will be inserted at. Will be 0 if not filled in. Optional |
Mock Border Z |
The Z coordinate that the mock border will be inserted at. Will be 0 if not filled in. Optional |
Mock Border Rotation |
The rotation that the mock border will be inserted at. Will be 0 if not filled in. Optional |
3 - Fill in the details for the drawings to be created.
3a - If each drawing is to have a different reference file, for example from a series of cross section, the 'CADtools' menu in Excel provides a routine which can fill the 'Reference 1' column with a list of DGN files from a selected directory.
4 - Save the Excel file and close.
5 - Start Microstation (if it wasn't already started) and open an existing file.
6 - Run the keyin "vba run [CADtools_Drg_Setup]BatchCreateDrgs.Batch_Create_Drawings" (Note: In future this will be part of the CADtools GUI)
7 - Browse for the Excel file containing the filenames and drawing titles to create, select the appropriate Seed file, and also provide the location where the new files will be created, this should be the location of where the Excel file is, if relative reference file paths are used in the 'Reference 1 - 3' columns.

8 - Sit back and wait for the the process to finish. Depending on your setting, the new drawing title blocks will be filled in with the information from the Excel spreadsheet, plus the current Client/Project titles from the ProjectSettings.txt. At this time, the references are simply attached to the default model, without any scaling, and 'co-incident' mode.
Direct link to this topic:
© 2013 Arup