CADtools Ustn and Navisworks |
  
|
CADtools Ustn and Navisworks |
|
Note The NavisWorks installer attempts to install plugins into various installed versions of Microstation. Even though they may have the same filenames, these plugins are specific to a version of Microstation (i.e the v8 2004 MDL will not work correctly with Microstation version XM. Similar for v8i.)
This guide is an attempt to help you make sure the right versions of the plugins end up in the right Microstation directories.
The JetStream installation works best if it is installed AFTER any Bentley products. This means if you add a Bentley product after you have installed the Navisworks products, the best remedy is to un-install JetStream and start again.
Versions
This technote has been prepared with software versions:
•Navisworks Jetstream – Version 5.5
•Microstation v8 2004 – 8.5.2.35
•Microstation XM – 8.9.4.51
Versions of NavisWorks earlier than version 5.4 do not include XM support.
At this stage, the ‘JetStream’ product is not able to natively open any v8 DGN files, so all models must be transported to NavisWorks via the ‘nwexport’ command.
After installing all the appropriate Bentley products, the Navis works installer will be able to integrate with those products. A typical installation is as follows:
1. If you have a downloaded installer, it will first unzip itself to a temp location, then run the NavisWorks setup utility.
2. Start install process, select “Desktop PC” as the installation type. This is mainly to do with licencing and ability to roam out of the office.
3. Accept the default installation locations for the NavisWorks products
4. Proceed with a Custom Install to ensure you install the Microstation 8 plugin and the Microstation XM plugin. Make sure you select both these plugins from the list. Do not just do a Typical install.

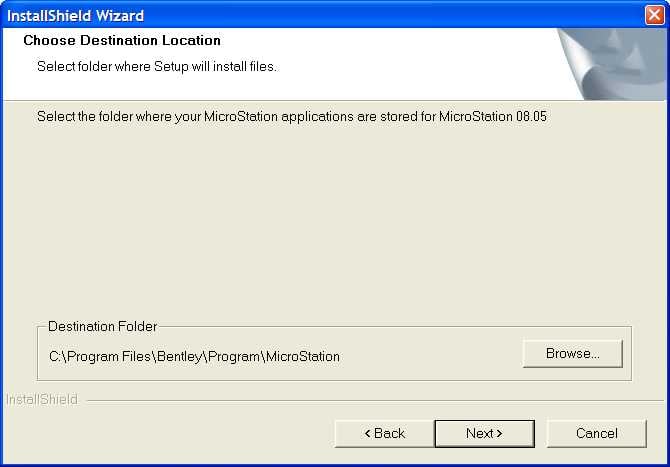
5. Important You will now be asked to provide the path to your Microstation installation locations, you will need to provide one path for the V8 2004 installation and one path for the v8 XM installation.
1. Take note of the dialog box, it will ask for a "Microstation 08.05" path (which is v8 2004). you must select the 'Microstation' directory, not just the relevant 'Bentley' directory that contains it. In most cases, that means the path for v8 2004 will be C:\Program Files\Bentley\Program\Microstation\
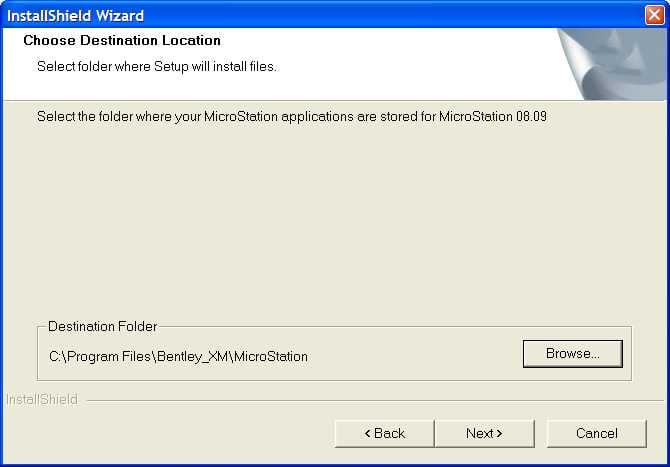
2. You will then be asked for a "Microstation 08.09" path (which is v8 XM). In most cases, that means the path for v8 XM will be C:\Program Files\Bentley_XM\Microstation\
3. If you encounter a dialog box warning that 'Couldn't find Registry entries or path' for the Microstation installation, then you will need to start the installation again, and make sure you select the correct path. If you simply click 'Back' in the installation, it doesn't allow you to re-select the path!

6. Allow the installer to finish the install, and then reboot if required.
For each version of Microstation, the Navis installer adds an MDL application into the <program location>\mdlapps\ folder. This is one of the standard Microstation MDL plugin locations, and will therefore be available in CADtools. In a directory below that it also adds some support files in the nwcreate_data5 directory.
This technote has been prepared with software versions:
•Autodesk Navisworks Simulate 2009 – Version 6
•Microstation v8 2004 – 8.5.2.35
•Microstation XM – 8.9.4.88
•Microstation v8i - 8.11.x.x
Similar to the Navisworks 5.5 installer, it is best to install NavisWorks after installing the appropriate Bentley products. Unfortunatly the Navis 2009 installer does not recognise Microstation v8i as a different version to Microstation v8 2004, and so it may be confused if you have v8i installed.
During the installation of Navis 2009, the installer will search your registry for the latest directory into which specific versions of Microstation have been installed. if you only have v8 2004 and XM installed, then the Navis installer should function correctly.
If you have v8 2004 and xm and v8i installed, then you may find that the NavisWorks installer correctly identifies the XM installation folder, but mis-identifies the latest v8i installation as being the correct place to install the v8 2004 version of the plugins. (At this stage the only way I know how to fix this is to manually move the files afterwards... --Steven.downing 05:05, 24 May 2009 (UTC))
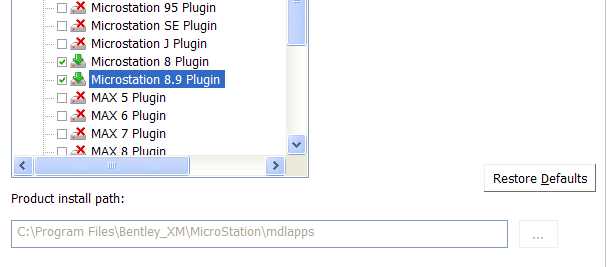
Above: The Navis installer has correctly identified the XM installation folder (Bentley_XM), and will install appropriate version of the plugin for Xm (v8.9)
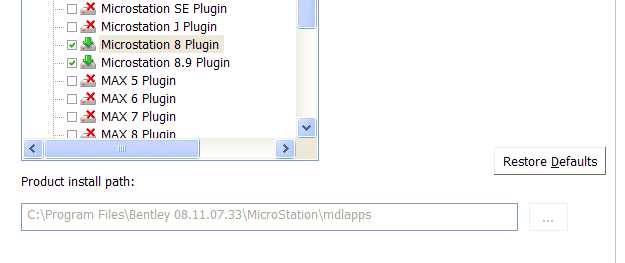
Here the Navis installer has in-correctly identified the v8i installation folder (Bentley 08.11.07.33) as the most recent install of Microstation v8 2004, and will install the incorrect version of the plugin (v8.0)
This technote has been prepared for the following software versions on 32bit and 64bit PC's:
•Autodesk Navisworks Simulate 2010/2011 – Version
•Microstation v8 2004 – 8.5.2.35
•Microstation XM – 8.9.4.88
•Microstation v8i - 8.11.x.x
•32bit Installer location is [Z:\National\CAD\Install\Autodesk Navisworks Simulate [year] x32]
•64bit Installer location is [Z:\National\CAD\Install\Autodesk Navisworks Simulate [year] x64]
Exporting your model
Once you have the model built in Microstation (or Triforma based products), to export the model(s) follow these steps.
1.Keyin one of the following commands (based on the Navisworks version you are loading). This only needs to be done once per Microstation session to load the plugin:
•'mdl load nwexport5' (Navisworks 5);
•'mdl load nwexport6' (Autodesk Navisworks 2009);
•'mdl load nwexport7' (Autodesk Navisworks 2010);
•'mdl load nwexport8' (Autodesk Navisworks 2011);
•You can also load it via Utilities > MDL applications and browsing to the location of your Navisworks installation;
2.Keyin 'nwcout' to open the Navisworks export window.
Note: At this stage, the options listed under the 'Options' button might include some bad paths for Triforma Familes/Parts and Materials. The export will still probably work, but you might loose some of this information. Future investigation is required into these aspects. If you are using non-standard Familes/Parts, then you may find that information is lost.
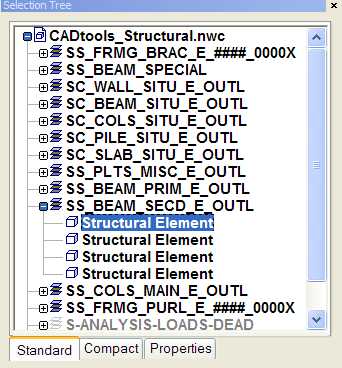
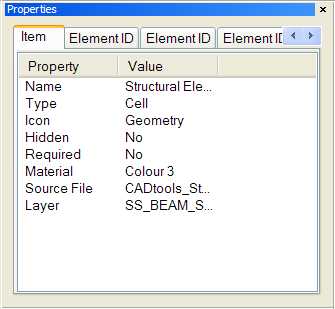
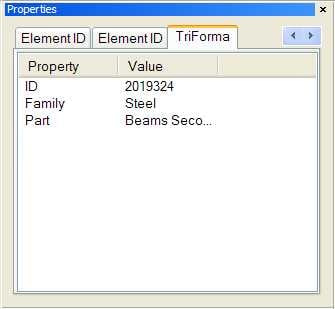
Test exports from both v8 2004 and v8 XM resulted in an NWC file that contained the layers from the DGN, as well as some Triforma Family/Part information, but none of the 'Structural Data' or other Triforma non-graphical information.
Direct link to this topic:
© 2013 Arup